Showing posts with label 3dsMax Tutorial. Show all posts

Friday, September 16, 2011

Been a while since i post my last 3dsMax 2009 tutorial, things quite busy at the moment, but here we are again. This time i`m gonna show you how to add lights in 3ds Max 2009. Follow the steps below :

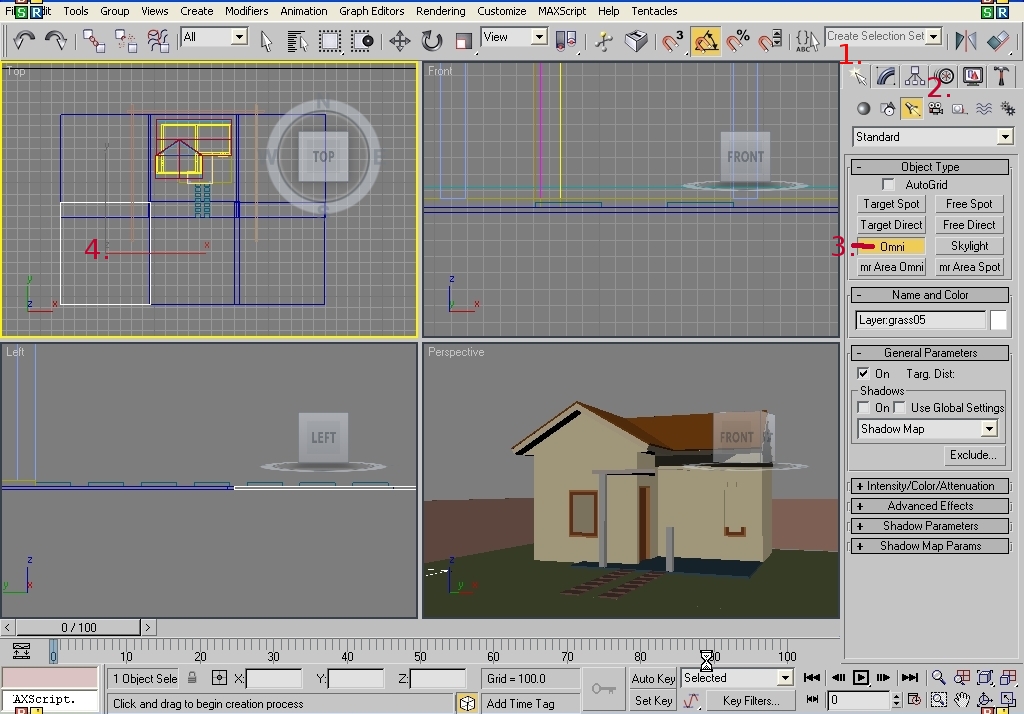
1. Go to menu on sidebar and click on CREATE --- LIGHTS. Then choose STANDARD and click on OMNI. See the pic below : 


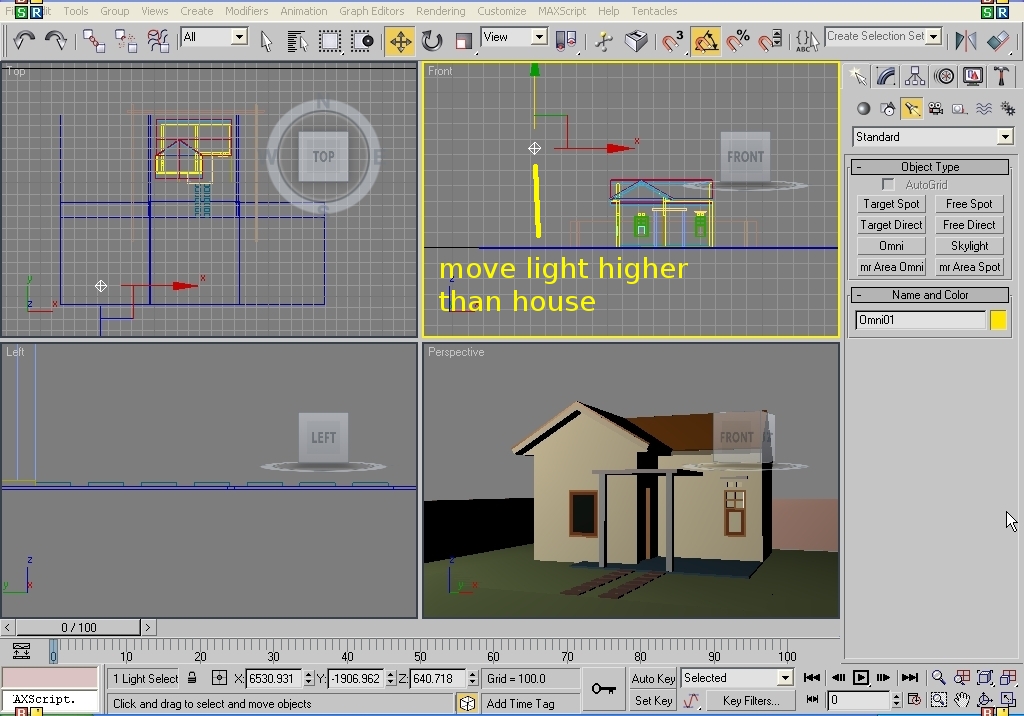
2. Now choose FRONT VIEWPORT and move the light higher than the house.


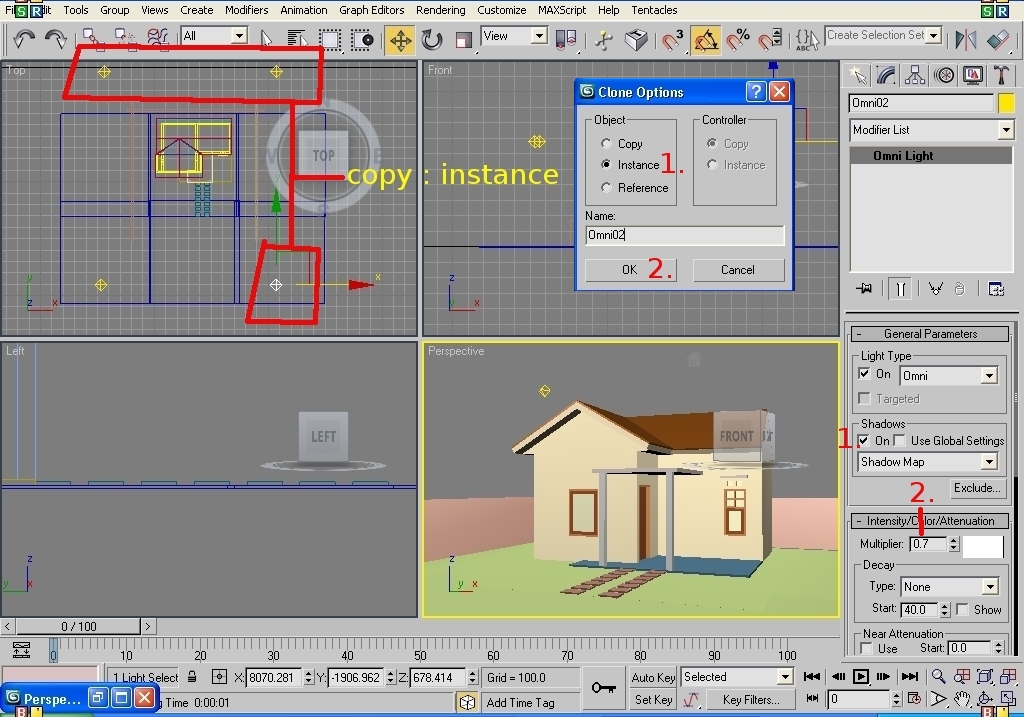
3. Now we`re going to copy the light. Change your viewport to TOP and select the first light that you made previously. RIGHT CLICK your mouse and select CLONE. When clone dialog show up select INSTANCE and OK. Then copy the light to each corner of the house. On sidebar menu choose MODIFY, CHECK on the shadow box and change multiplier to 0.7. See the pic below :


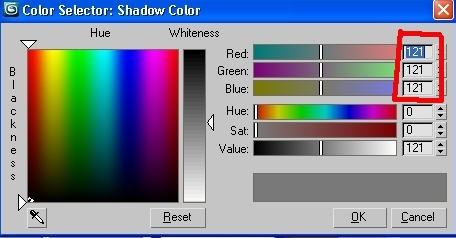
On shadow parameters rolls out click on the COLOR BOX.


And change the value of Red, Green, Blue to 121. Click OK


4. Now let`s do render test. Go to RENDERING and choose RENDER.


If you have question, feel free to ask me :)

Cheers,
Jaenne

Monday, September 5, 2011

How to apply Background Image in 3dsMax 2009, follow this steps :

1. Go to RENDERING on menu and choose ENVIRONMENT. Click on NONE box and when MATERIAL/MAP BROWSER open DOUBLE CLICK on BITMAP. See the pic below :


2. On your image directory, choose the background image you want, then click OPEN.


3. Now lets run render test. Go to RENDERING and choose RENDER. Now you have background on your model.


If you have question feel free to ask me :)

P.S
I just created Facebook Page, so LIKE this blog there? :D

Cheers,
Jaenne

Sunday, September 4, 2011

You can apply the material transparency so the applied object will appear translucent. Follow the steps below :

1. Click on SELECT BY NAME icon on toolbar. When the dialog box show up, choose LAYER:GLASS and click Ok.


2.Go to RENDERING on menu and choose MATERIAL EDITOR or just press M for shortcut. When material editor dialog box show up, select your material slot. Change the opacity to 70. Then click on DIFFUSE COLOR box and choose GREEN or any color you want. After that click OK. See the pic below for the steps :


3. Back to material editor box change name to GLASS and click on ASSIGN MATERIAL TO SELECTION icon. Now your material is selected.


4. Let`s run render test. Go to RENDERING and click RENDER. The pic below is the result.


If you have question feel free to ask me :)

P.S
I just created Facebook Page, so LIKE this blog there? :D

Cheers,
Jaenne

Tuesday, August 30, 2011

Cylindrical mapping is mapping material for objek cylindrical. I give you an example how to apply cylindrical mapping on cup. Follow the steps below :

1. Click on SELECT BY NAME icon on toolbar. When the dialog box show up, choose LAYER:CUP and click Ok.


2. Go to RENDERING on menu and choose MATERIAL EDITOR or just press M for shortcut. When material editor dialog box show up, select your material slot. On Blinn Basic Parameters rollout click on DIFFUSE box, then double click on BITMAP. See the pic below :


3. On your folder, choose the image that you like to apply on your model. Click OPEN.


4. Back to material editor window, CHANGE NAME TO CUP and click on ASSIGN MATERIAL TO SELECTION icon.


5. Close you material editor and go to MODIFY on sub-toolbar. NARROW DOWN the modifier list and choose UVW Map. On Parameter rollout choose Cylindrical option and on Allignment check the X. See the pic below :


6. Now let`s run the test render. Go to RENDERING and choose RENDER. Pic below is the result :


If you have question, feel free to ask me :)

Cheers,
Jaenne

Thursday, August 25, 2011

We can create and apply stone material from image file by increase the bump value, so tonjolan - tonjolan batu dapat tampak. Follow the steps below :

1. Click on SELECT BY NAME icon on toolbar. When the dialog box show up, choose LAYER:STONE and click Ok.


2.Go to RENDERING on menu and choose MATERIAL EDITOR or just press M for shortcut. When material editor dialog box show up, select your material slot. On Blinn Basic Parameters rollout click on DIFFUSE box, then double click on BITMAP. See the pic below :


3. On your folder, choose the image that you like to apply on your model. Click OPEN.


4. Back to material editor window, ASSIGN MATERIAL TO SELECTION then click on GO TO PARENT icon. On MAPS roollout cek BUMP option, change the amount to 100 and click on NONE. When material/map browser dialog show up double click on BITMAP. See the pic below :


Search the stone material on your folder and OPEN it. See the pic below :


5. Close you material editor and go to MODIFY on sub-toolbar. NARROW DOWN the modifier list and choose UVW Map. On Parameter rollout choose PLANAR option and check the U & V box. See the pic below :


6. Now let`s run the test render. Go to RENDERING and choose RENDER. Pic below is the result :


If you have question, feel free to ask me :)

Cheers,
Jaenne

Monday, August 22, 2011

Okay now i`m gonna show you how to apply photo or picture material in 3ds Max 2009. Follow the steps below :

1. Click on SELECTED BY NAMES icon on toolbar. When the dialog box show up choose LAYER:FRAME and click OK.


2. Now click RENDERING on menu and choose MATERIAL EDITOR or just press M for shortcut. Choose your slot material, click on GET MATERIAL icon, when the material/map browser display check on MTL LIBRARY and OPEN. Search ARCHITECTURAL.MATERIAL.WOODS & PLASTICS.MAT and click OPEN.


3. When the material/map browser show up again, search for Woods & Plastics.Finish.Carpentry.Wood.Walnut, DOUBLE CLICK IT. After that change the name to FRAME and click on ASSIGN MATERIAL TO SELECTION icon. See the pic below :


4. Repeat step #1 but this time choose LAYER:PHOTO. When the material editor show up choose your slot material, click on DIFFUSE icon. And click on Bitmap on material/map editor dialog box. See the pic below for the steps :


5. Choose the photo on your photo library and click OPEN. Click on MODIFY icon on sub-toolbar and click NARROW DOWN and choose UVW Map. Check the BOX option and check the U & V box.


6. Now let`s run test render. Go to RENDERING on menu and choose RENDER. You can see now the photo is already apply on our model.


If you have question, feel free to ask me :)

Cheers,
Jaenne

Thursday, August 18, 2011

Material mapping is important of its existence, namely to determine the direction of application of the material on the object. Application of the plane requires different handling by the application of the object cylinder and sphere. Mapping material usually apply on grass, tiles, stone, roof, and wood. In this post i`m gonna show you how to apply mapping material on paving stone model in 3ds Max 2009. Follow this steps :

1. Click on SELECT BY NAME icon on toolbar, when the dialog box show up choose LAYER:PAVING STONE and click OK.


2. Now click on MODIFY icon on sub-toolbar and click NARROW DOWN and choose UVW Map. See the pic below for the steps:


3. When the PARAMETERS show up, check the BOX option. After that on U Tile & V Tile, insert the value you want example 5. Don`t forget to check the FLIP box. See the pic below for the steps :


In this part you can choose the mapping option depends on your model. But if your model is Cylindrical, on Alignment group, cek the X button. Like the pic below :


4. Let`s do test render. Go to RENDERING and choose RENDER. Now you can see the mapping material is already applied on your model.


Repeat the steps from 1 - 4 to others model like grass, tiles, stone, roof, and wood. If you apply the mapping material correctly the final result should be like the pic below :


If you have question, feel free to ask me :)

Cheers,
Jaenne
Enhanced by Zemanta

Friday, August 12, 2011

Ok now we`re at the last part of apply material in 3dsMax 2009. This last part is how to apply window glass material in 3dsMax 2009. Follow the steps below :

1. Click on SELECT BY NAME icon on toolbar. Choose LAYER:WINDOW and click OK.


2. Go to RENDERING on menu and choose MATERIAL EDITOR or just press M for shortcut. When material editor show up, choose new slot material and click on GET MATERIAL icon. MATERIAL/MAP BROWSER dialog box will pop up, cek MTL LIBRARY and click OPEN. Search for ARCHITECTURAL.MATERIAL.DOORS & WINDOWS on your material library and click OPEN. See the pic below for the steps :


3. When MATERIAL/MAP BROWSER show up again search for DOORS.WINDOWS.GLAZING 2. DOUBLE CLICK it so it will place on your material slot. After that change name to WINDOW and click on ASSIGN MATERIAL TO SELECTION icon. So now your material is already selected.


4. Let`s run render test. Go to RENDERING and choose RENDER. Now you can see your window glass material is applied on your model.


If you have question, feel free to ask me :)


Cheers,
Jaenne
Enhanced by Zemanta

Sunday, August 7, 2011

This post i`m gonna show you how to apply roof material in 3dsMax 2009. Follow the steps below :

1. On toolbar click on SELECTED BY NAME icon. When the box dialog pop up choose LAYER:ROOF then click OK.


2. On menu click RENDERING and choose MATERIAL EDITOR or just press M on keyboard for shortcut. When material editor dialog box show up, choose new slot. Then click on GET MATERIAL icon. When MATERIAL/MAP browser show up cek MTL LIBRARY and click OPEN. Search for ARCHITECTURAL.MATERIAL. THERMAL & MOISTURE.MAT on your folder then click OPEN. See the pic below for the steps:


3. When material/map browser dialog box show up, search for THERMAL & MOISTURE.ROOF.TILES.SPANISH.RED.1. DOUBLE CLICK it so it will palce on your material editor. After that change the material name to ROOF, and click on ASSIGN MATERIAL TO SELECTION to your material is selected now. See the pic below for the steps :


4. Now let`s run render test. Go to RENDERING on menu and choose RENDER. You see now your material is already applied on your modelling.


If you have question, feel free to ask me :)

Cheers,
Jaenne

Wednesday, August 3, 2011

How to apply Listplank Material in 3ds Max 2009. Follow the steps below :

1. Click on SELECT BY NAME icon on toolbar. When the box dialog show up, select LAYER:LISTPLANK and click OK.


2. Go to RENDERING on menu and choose MATERIAL EDITOR or just press M for shortcut. When material editor dialog box show up choose new slot and click on GET MATERIAL icon. When MATERIAL/MAP browser dialog box show, cek MTL LIBRARY and OPEN. On material library folder, search for ARCHITECTURAL.MATERIAL.WOODS & PLASTIC.MAT the click OPEN. See the pic below for the steps.


3. When the material/map browser box show up again, search for WOODS & PLASTICS.FINISH CARPENTRY.WOOD.POPLAR. DOUBLE CLICK it. So now your listplank material is already on material editor slot.


4. Back on material editor change the material name to LISTPLANK and click on ASSIGN MATERIAL TO SELECTION. So now your material is selected.


5. Now let`s run render test. Go to RENDERING menu and choose RENDER. You can see from the pic below. Listplank material is already applied on the model.


If you have question, feel free to ask me :)

Cheers,
Jaenne
Enhanced by Zemanta
Related Posts Plugin for WordPress, Blogger...